I think the solution calls for a cultural shift to focus more on quality and maintainability. In the short term, it will appear that we are less productive. In the long run, however, the code will be more robust, scalable, and maintainable which ultimately provides the most value to the company.
Bad smells
I think the solution calls for a cultural shift to focus more on quality and maintainability. In the short term, it will appear that we are less productive. In the long run, however, the code will be more robust, scalable, and maintainable which ultimately provides the most value to the company.
Setting up a hosted svn server using tortoise svn and collabnet subversion server
Most professional developers use some form of version control at their work but lack such a support system at home. One of the easiest ways to get up and running is by using TortoiseSVN for Windows. The best part about it is that it is both intuitive and FREE! Furthermore, if you have a separate pc that you want to use as a hosted source control server, you can use CollabNet Subversion Server (also a free application).
This tutorial is designed to show how to host a subversion server so it is available to other machines on your network. For my setup, I am running Windows 7 Ultimate edition x64 on my primary machine. For my secondary machine (named BuildServer), I am running Windows 7 Ultimate x32 in a hosted VMWare virtual machine. Both systems already have TortoiseSVN installed. TortoiseSVN is simply one of the best windows clients for subversion. You can download it from: http://tortoisesvn.tigris.org/
The next step is to go to the machine where you want to host your source control server. Download the CollabNet Subversion Server for Windows from the following link: http://www.open.collab.net/downloads/subversion/
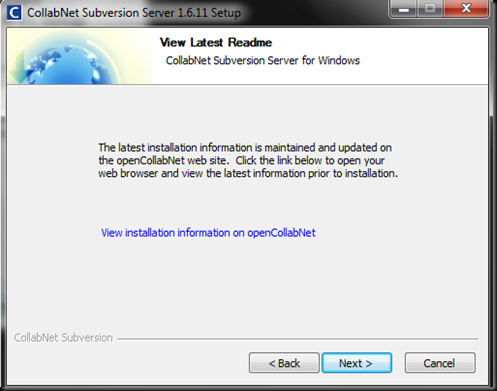
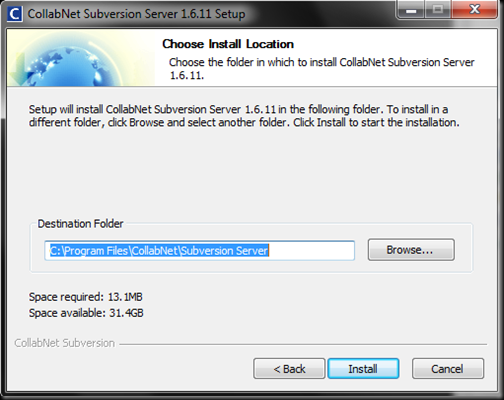
Once downloaded, begin your install process. The following set of screen shots show what you can expect (as you can see, I am currently using CollabNet Subversion Server 1.6.11).
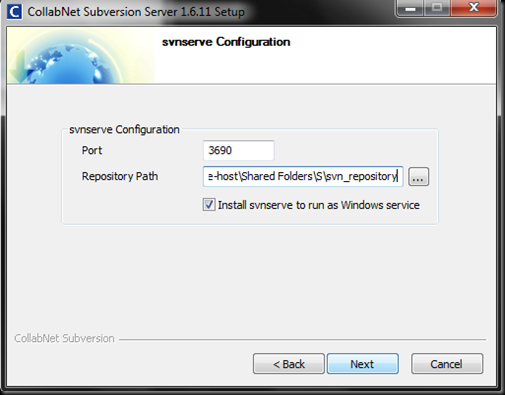
There are a few options for how you want to host your source control server. Since I am on a Windows machine that has IIS running, I chose to run CollabNet Subversion Server as a windows service. The alternative would be to use the included Apache(MOD_DAV_SVN) server. It has it’s own advantages, but I was not patient enough to get the configuration properly set up side by side with IIS. I suspect, if I didn’t have IIS on the machine, the Apache install would have been just as easy.
Here I chose the default port for communication but I modified the Repository Path to a shared network drive. By default, it prompts to put the repository in C:\svn_repository. I, however, wanted it on a network path so it can properly be backed up in the event that my virtual machine is turned off.
All of the other selections I chose were the defaults.
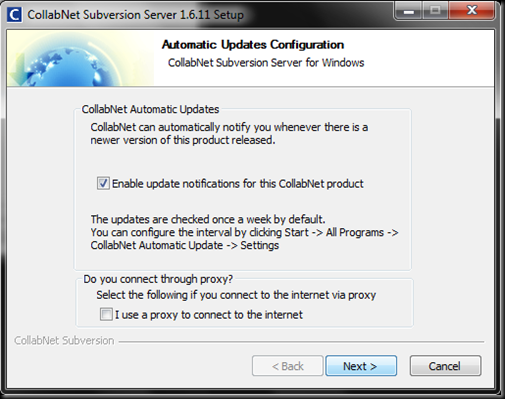
Once I initiated the install itself, it also prompted me to enable update notifications.
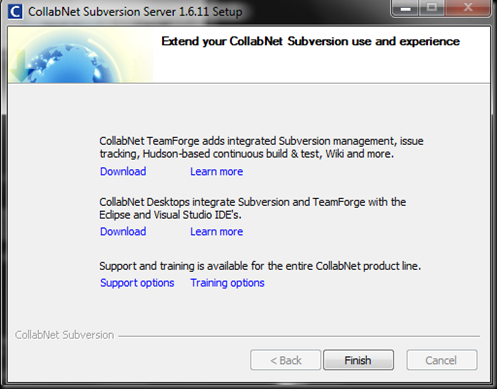
It ran the auto-update and then showed this last prompt to finish.
I don’t recall for certain, but I think the system then prompted me to reboot my machine. Whether prompted or not, I happened to reboot my machine. You can then verify it installed by opening the command prompt and running “svnadmin –version”.
I recommend running the command line in administrator mode so you can then perform the next step.
After confirming the software installed successfully, you need to create the service in windows. This can be done through the command prompt using the following command:
sc create binpath=”\C:\Program Files\CollabNet\Subversion Server\svnserve.exe\” –service –root C:\” displayname= “Subversion” depend= tcpip start= auto
NOTE: if this command fails to install or you see a different script response, double check that you are running the command prompt in Administrator mode (applicable to Vista & Windows 7 configurations) and that you have administrator rights on the machine.
Next, go to your system services. Find “CollabNet Subversion svnserve” and start the service. A reboot would have been just as effective because the service is set to start automatically. Alternatively, I could have started the service from command line.
For curiosity, I examined the properties of the service and the path to the executable was listed as follows:
"C:\Program Files\CollabNet\Subversion Server\svnserve.exe" --service -r "\\vmware-host\Shared Folders\S\svn_repository" --listen-port "3690"
Notice the switches specifying the repository path and the listen port. Depending on how secure you’ve got your machine set, you may need to explicitly open the port the local firewall and/or router.
First, verify that the service is working successfully by opening your TortoiseSVN client and entering “svn://localhost” as your repository url.
Once you have verified you can access the repository locally, try to access it remotely. Go to your other machine that is on the same network. Open the TortoiseSVN repository browser and browse either by using the machine’s name or direct IP address.
That’s it! You are now up and running with your very own hosted source control. I have even verified that after I configured the port pass through on my firewall, I can access my repository server from outside of my home network! Consider yourself warned though. Configuring the port pass through is a definitive security risk. I recommend before setting up your repository for remote access, you consider seeking help from your friendly network administrator….oh wait. If you are reading this, you probably are your own network admin! Just be careful and good luck!
Happy Coding!
Simple Generic Upcast example in vb.net using reflection
Here is a quick example of how one can use reflection to perform an upcast in vb.net.
In the sample code below, you have a person class and a contact class. The contact class inherits from the person class. Additionally, you have an instance of the Person class which needs to be converted to an instance of the Contact class. The below code can be used to perform this conversion.
This may not be the best way to do this, but it is certainly an easy and quick way of performing the task.
- Module Module1
- Sub Main()
- Dim p As New Person() With {.First = "Test", .Last = "User"}
- Console.WriteLine("{0} {1} {2}", p.GetType.FullName, p.First, p.Last)
- Dim c As Contact = Upcast(Of Person, Contact)(p)
- c.Phone = "555-123-4567"
- Console.WriteLine("{0} {1} {2} {3}", c.GetType.FullName, c.First, c.Last, c.Phone)
- c.CallContact()
- Console.ReadLine()
- End Sub
- Public Function Upcast(Of B, S As {New, B})(ByVal baseObj As B) As S
- Dim superObj As S = New S()
- Dim superProp As System.Reflection.PropertyInfo = Nothing
- For Each baseProp As System.Reflection.PropertyInfo In baseObj.GetType().GetProperties()
- superProp = superObj.GetType().GetProperty(baseProp.Name)
- superProp.SetValue(superObj, baseProp.GetValue(baseObj, Nothing), Nothing)
- Next
- Return superObj
- End Function
- Public Class Person
- Private _First As String
- Private _Last As String
- Public Property First() As String
- Get
- Return _First
- End Get
- Set(ByVal value As String)
- _First = value
- End Set
- End Property
- Public Property Last() As String
- Get
- Return _Last
- End Get
- Set(ByVal value As String)
- _Last = value
- End Set
- End Property
- End Class
- Public Class Contact
- Inherits Person
- Private _Phone As String
- Public Property Phone() As String
- Get
- Return _Phone
- End Get
- Set(ByVal value As String)
- _Phone = value
- End Set
- End Property
- Public Sub CallContact()
- Console.WriteLine("Calling {0}....", Phone)
- End Sub
- End Class
- End Module
My favorite ssms Toolspack snippet
Sometimes we all need a good laugh. One of the tools I use is the SSMS Tools Plug-in for Microsoft SQL Server Management Studio (SSMS). Today, I learned that there are shortcut snippets for some of the more common SQL commands. As I was looking through the snippet shortcuts, I had to laugh when I discovered the last default snippet entry. Check it out and give props to the authors of this tool for creating the tool with a shortcut to express how we all sometimes feel!
SSMS Tools is a free plug-in that you can download from http://www.ssmstoolspack.com/. It does offer many other useful features. I do recommend this tool as a nice enhancement to SSMS. It really is a great plug-in and it deserves proper recognition as well. Thank you for creating such a great tool and maintaining a sense of humor while doing so.
Fun with reflection: Invoking a private method
I was recently working on a project where the use of reflection became one of the proposed solutions. Before I go any further, allow me to preface this by saying that reflection can be costly and have negative performance impacts. It is not always type safe and may lead to run-time exceptions. Other alternatives should be considered before committing to using reflection as a solution.
The scenario we had was we needed to access a private method inside a legacy .NET assembly. I'm not going to get into the reasons why. The alternative was to duplicate all of the logic that was needed from legacy code. I mentioned to a co-worker that we could use reflection to invoke a private method. He was skeptical so I provided him with the following spike solution code showing how to do just that. It's a simple, but complete working example that I thought I would share with all of you.
- using System;
- using System.Collections.Generic;
- using System.Reflection;
- namespace ConsoleApplication1 {
- class Program {
- static void Main(string[] args) {
- HelloWorld hw = new HelloWorld();
- hw.SayWhatsUp();
- hw.name = "World";
- BindingFlags eFlags = BindingFlags.Instance | BindingFlags.Public | BindingFlags.NonPublic;
- MethodInfo hi = null;
- hi = hw.GetType().GetMethod("SayHi", eFlags);
- object[] a = new List<object>().ToArray();
- if (hi != null) {
- hi.Invoke(hw, a);
- } else {
- Console.WriteLine("Method Not Found.");
- }
- Console.ReadLine();
- }
- }
- public class HelloWorld {
- public string name { get; set; }
- public void SayWhatsUp() {
- Console.WriteLine("Whats Up");
- }
- private void SayHi() {
- Console.WriteLine("Hi " + name);
- }
- }
- }
When to trust that gut feeling...
This week has emphasized some common knowledge that I went against earlier this week. Monday morning I wasn't feeling well but figured I could make it through the day. When I got to work, I was informed of a bug in our production code that I had introduced a few months ago. Though the problem had existed for a few months, it was considered critical and needed to be fixed immediately. Despite not feeling up to par, I began investigating the issue. As my day progressed, I began to feel worse yet I continued to work at the problem. By mid-day, I was nearly complete with a solution one of my team members suggested despite having a gut feeling it wasn't quite right. I couldn't explain how it wasn't right or prove it wasn't the perfect solution so I went with it. I rushed through what I felt was a complete solution and did some quick testing. Everything seemed to work and I needed to go home. I felt like I was beginning to develop a fever.
I quickly deployed the changes to our TEST environment and updated my team on what I had done. I then went home and went to bed. I basically slept through the night and called in sick on Tuesday. My technical lead confirmed that QA had signed off on the hot fix I prepared and formalized the paperwork for deployment. It went out early Tuesday afternoon seeming to have resolved the existing issue.
Fast forward a few days to today...Friday. Whatever bug I had earlier in the week has long since passed. Around 2:45pm today, I received an email depicting an exception that the application I had worked on was causing. Again, it was deemed as critical for billing and payroll purposes. Needless to say, it needed to be fixed immediately. Investigating the bug revealed that the hot fix that was pushed out on Tuesday has now caused this new issue which requires a hot fix. I tried my best to resolve the issue by the end of day but with each fix I added a new error occurred. I certainly wasn't going to push out a hot fix that is known to be flawed and hasn't been tested at 5:00pm on a Friday. The fix will have to wait until Monday.
I think there are a few important lessons to be learned here:
1. Don't be a hero. If you aren't feeling well, just call in sick.
2. Don't work on critical code unless you are thinking clearly.
3. Don't rush critical fixes no matter how trivial they may seem.
4. All code should be tested. Changes resolving a critical issue MUST be tested thoroughly! At the very least, test the fix itself and perform some basic regression testing. A full regression test should be performed if possible.
5. Trust your gut! If you have a bad feeling about something, there is likely a reason for it.
Important Lessons!
Tonight I experienced the fear that many of my friends and family have felt when they thought they lost everything on their PC. I recently purchased a copy of Windows 7 and was eager to install it. My existing set up was a Tri-boot (Windows 7 RC, Vista, & XP Pro). The XP pro for some reason wouldn't allow me to boot into it after about a month of successfully running all 3 operating systems on the same drive. My machine also has an internal drive partition that I used strictly for data storage amongst all the configurations and a separate partition used for a common "My Documents" folder and some other miscellaneous items. With Windows 7 in hand, I diligently went through the each OS and moved all of the data stored in the OS partitions into my data storage partition for safe keeping. Once I was sure I had everything copied over, I decided I would wipe the existing 3 operating systems and start fresh with a single copy of Windows 7 Ultimate edition.
I popped the install disc in and booted back to the cd. Upon starting the install, I chose to delete my "XP" partion, my "Vista" partition, and my "Win7RC" partition. I completed the install process on the new unallocated space and booted back into windows. During bootup, something strange caught my eye though. The OS selection briefly appeared asking if I wanted to boot into Windows 7 or Windows 7 indicating that there were 2 operating systems still installed. "Impossible!", I thought. I logged into the fresh install of Windows 7 and immediately went to "My Computer" to access my data storage drive. Much to my surprise, it wasn't there! In its place, however, was my previous Win7RC partition staring right back at me. After the initial panic and wave of nausea passed from thinking I just deleted over 400 GB worth of personal data (of which only 1/2 was properly backed up to an external drive), I started to think it through.
When a file gets deleted in windows, the data itself is not typically deleted/removed. Instead, windows gets notified that the space that data had occupied is now available for allocation. I began thinking that the deleting a partition would likely follow the same rules since I didn't reformat the disk. The only question was how to access the deleted partition...
Using my wife's laptop (since I was afraid doing anything on my machine would increase the chance my precious files would be over written), I began to google for free utilities that would retrieve the deleted files. As I was doing that, I figured it would be worth a shot to pull the plug for force a shutdown without saving anything and reboot back into my pre-existing Windows 7 RC install.
The chance to boot back into the old OS proved to be the perfect solution. After logging in, I opened "My Computer". Though the XP and Vista partitions were no longer showing, the data storage drive appeared to be fully intact!!! I can't even begin to explain the relief I felt knowing that all my photos, music, movies, financial records, and source code were still there. As I write this, all my data is being copied to an external hard drive which will be disconnected to ensure I don't make any more foolish mistakes. Tomorrow, I will finish setting up and customizing the new OS as I want it, then I will decide on a more appropriate and consistent back up strategy to prevent this type of scenario from occurring again.
So, what I have learned out of all this? First and foremost is that I have been a hypocrite in telling friends and family to implement some sort of data back up plan on a regular basis. Second, that I need to decide on what the best backup strategy is for me and my family....and third, that I need to actually USE the backup strategy that I thought through. Backing up once every 6 - 12 months just doesn't cut it. Tonight I consider myself very fortunate that all was not lost. I hope this may be a learned lesson to all of you as well. Though I got lucky this time, I don't think I would be the next time. I do know this though, I will do everything I can to ensure that I am never in the position again. It's terrifying to think about losing approximately 9 years worth of digital data!

